Using Synergy with your Raspberry Pi

If you have a lot of computers running at the same time and you don’t want to have to wrangle multiple keyboards and mice to control them all, you need Synergy.

Raspberry Pis are so small and cheap that, if you’re like me, you will probably end up with a few on your desk at the same time. Using Synergy (from Symless) you can enable your main keyboard and mouse to control all of them.

Synergy is easy to use – you simply mouse out of your main screen and over to the monitor of the other machine to control it. Whichever screen has the mouse focus also gets the keyboard input. It’s almost magical.

Synergy screen config page
Define your screen arrangement using Synergy

With Synergy, you have one computer acting as the server; this is the machine that has the keyboard and mouse we will use to control the other computers. Other computers connect to the server as Synergy clients.

Both the client and the server must be running compatible versions of Synergy. Unfortunately, current Raspbian builds only contain older versions of Synergy and these won’t work if your Synergy server is running a later version. If your server computer is a Mac or Windows machine this will probably be the case.  If you are in this situation, you will need to build a more recent version of Synergy on your Pis from source.

Note: I recommend you buy the Pro version of Synergy, not only because it adds SSL support but because the USD29 will support the ongoing development of the product.

Doing the build

I’m building on a Raspberry Pi Zero W running a newly-flashed SD card of Stretch Raspbian with Desktop.

To start, update the pre-installed packages then install the prerequisite packages for Synergy.

sudo apt-get update
sudo apt-get upgrade -y sudo apt-get install cmake make g++ xorg-dev libqt4-dev libcurl4-openssl-dev libavahi-compat-libdnssd-dev libssl-dev libx11-dev

While that’s happening, download the source of Synergy from https://symless.com/synergy/downloads as a tar.gz file and copy it to your Pi. Then

tar xzf synergy-v1.8.8-stable-25a8cb2-Source.tar.gz
cd synergy-v1.8.8-stable-c30301e-Source

Now you’re in the source directory you need to run the configure step

QT_SELECT=4 ./hm.sh conf -g1

Note: If you see an error “Error: Could not get revision, git error: 128” you can safely ignore it.

Then:

./hm.sh build

If you get an error “Error: make -w failed with error: 512″ you can ignore that too.

Now you can the build the GUI app.

cd src/gui
qmake
make

Go back to the source root and copy all the built binaries to /usr/local/bin

cd ../../
sudo cp bin/syn* /usr/local/bin

Then run the Synergy GUI,

/usr/local/bin/synergy &

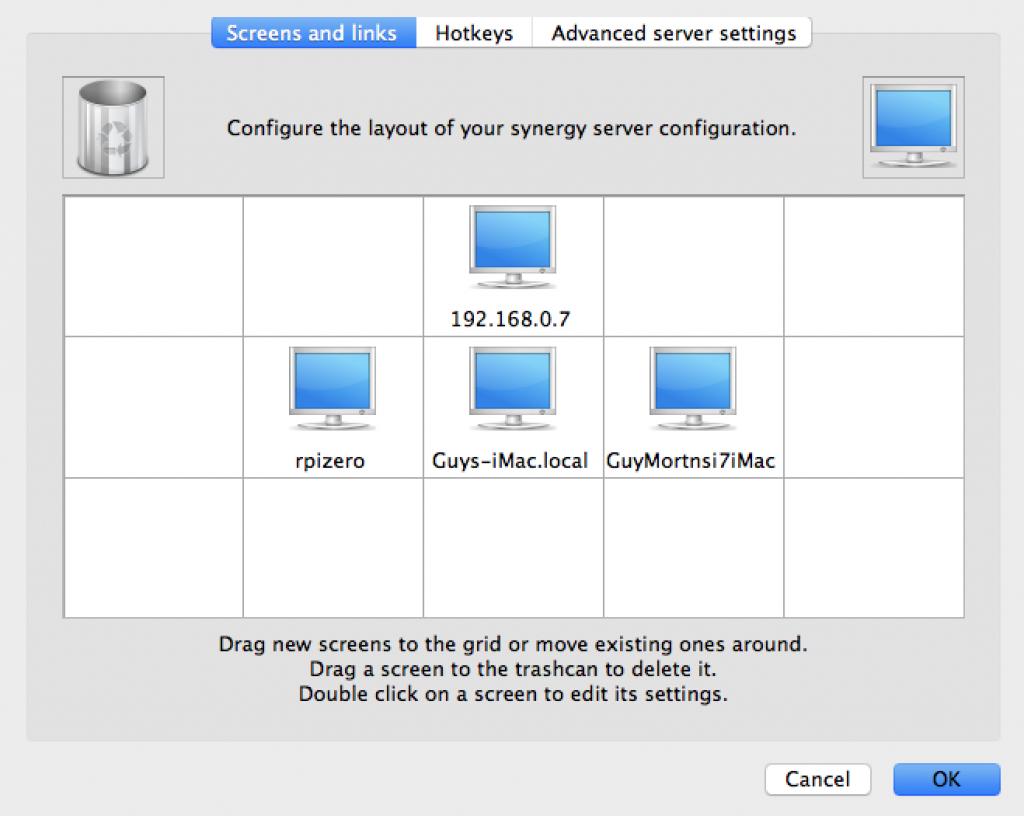
In the GUI you can configure the server you will connect to, and enter your license key, if you have one.

Making sure Synergy is always running

You want Synergy to start on boot, so you never have to reconnect the keyboard or mouse. Follow these instructions to do that (adapted from this page):

sudo raspi-config
(Select "Boot Options", then "Desktop Autologin")

Create the Synergy client autostart file (must be as user pi, NOT root!)

mkdir -p ~/.config/autostart
nano ~/.config/autostart/synergy.desktop

Write a little bash script to start synergyc with the necessary options. This is based on one I found here – you should modify the command line to match your setup (eg remove the enable-crypto flag if you won’t use SSL).

#!/bin/bash

killall synergyc
sleep 1
/usr/local/bin/synergyc -f --no-tray --debug INFO --name rpizero --enable-crypto 192.168.0.127:24800
exit 0

Now edit the synergy.desktop autostart file and tell it to run your script:

[Desktop Entry]
Name=Synergy Client
Exec=/home/pi/.startsynergy.sh &
Type=application

Reboot your Pi and check it auto-connects, then enjoy the freedom of a desk free of multiple keyboards and mice!

Creating an Alexa device on a Raspberry Pi

I’ve been a fan of the Raspberry Pi for a few years now. This diminutive device, along with various other incredible tiny pieces of hardware, has helped drive a resurgent interest in physical computing and helped create the Internet of Things.

For those of you who don’t know what these things are, they’re credit card sized computers, complete with a CPU, GPU, RAM, Ethernet port, USB ports, WiFi, and Bluetooth. They have onboard sound and video support via HDMI.

Sounds expensive, right? Nope. Less than sixty Australian dollars will buy you one.

Raspberry Pi device
Raspberry Pi approximately actual size

Anyway, the other thing that I’m very interested in right now is how voice-based AI systems (eg Siri, Cortana) are being used to build the human-computer interfaces of the future. So, I was excited to see Amazon Web Services release their new Alexa Voice Service SDK to developers, and doubly so to see them provide support for running it on the Pi.

The AVS SDK is designed to allow device manufacturers to build their own Alexa device, but Raspberry Pi owners (or anyone with a computer running Linux or MacOS) can also get in on the act. For free. All it’ll cost you is the time setting it up, and in the case of a Raspberry Pi, the $55 for the Pi 3 plus another $30 or so for a few other bits and pieces.

That’s so cheap, you can start thinking about what it might be like to give a spoken-word interface to all the things you interact with.

Alexa everywhere

Sounds great, right? And it is, but technology is complicated and like someone once said “there ain’t no such thing as a free lunch”. Kudos to AWS for making such complete-looking documentation to get AVS on a Pi, but even though I followed it closely, there were still some places I stumbled.

I’m going to describe those here now so maybe you won’t have the same frustrations I did.

Prepare your device

First of all,  make sure you have your sound hardware sorted out before you begin. The Pi 3 has no audio inputs on board, so you have to buy a USB audio “card” (actually a USB dongle) to create an input for your microphone. There are units that are known to be compatible with the Pi – I suggest you buy one of those. I used a different type, but it worked, so I guess I just got lucky.

Once you have your audio card set up, check that you can record and listen back to audio. You can use arecord and aplay to do that:

$ arecord -d 10 -f S16_LE -r 16000 test.wav
$ aplay test.wav

If you hear what you’ve recorded, you’re on your way to success. If you don’t, or you hear static, you may need to follow this guide to set up your Pi to use your hardware.

Another tip before you begin – the guide suggests you might like to build your Alexa on the Lite version of Raspbian, which has no GUI, ie it does not include a point and click “windowed” desktop environment. If you choose to do this (it does make sense if this will be a dedicated Alexa device) you will need to be aware that various instructions in the guide are written as if you can open a web browser on the device, which you won’t be able to do. Instead, you will need to do the steps that involve a web browser from another machine on your network, ie treating the Pi like a web server. To do this you will probably need to set up an SSH tunnel that port forwards between the machines. For reference, the command to do that (from the machine with the web browser) is:

ssh -L 3000:192.168.0.81:3000 -p 22 -l pi -N 192.168.0.81

Where 192.168.0.81 is the IP of your Pi, and “pi” is the username you log on with.

Rubber, meet road

Ok, if you’ve gotten to this point, you’re ready to start going through the quick-start guide and installing the AVS SDK and sample app software on your Pi.

Go ahead, I’ll wait.

waiting...

This bit is going to take an hour or so, because the instructions do a lot of building of binaries from source instead of relying on the in-built package manager in Raspbian (apt). As it turned out, I ended up with reason to question the wisdom or necessity of at least some of that, but more on that later.

Once all the software has been compiled you’re at the exciting part where you fire up the AuthServer to get a token to bring Alexa to life. If you followed the guide like I did, though, you will be seeing errors about Flask about now.

The problem is that they missed a step in the Raspberry Pi guide – you need to install the Python package manager (pip), and use it to install Flask because the AuthServer uses it. They did list these instructions in the generic Linux guide, so you can follow the steps there, or tl;dr:

sudo apt-get install python-pip
pip install flask requests

Ok, so now you can run the authorise process and you have your token. If you’re like me, you’ll be very keen to run the sample app and ask Alexa some probing questions.

If you’re like me though, you will also get to the end of the guide, run the app and find Alexa remains stubbornly silent.

Hmm.

Finding the debug switch

In my case, everything *looked* like it was working fine – the app woke up when I said “Alexa”, said it was listening, then thinking…but there was no audio response. Of course, after all that time sitting watching the compiler this is the last thing you want to see.

So, what was going wrong? I needed to run the app in debug mode so I could see what errors were being thrown. The Pi guide doesn’t mention how to do this, but the Linux guide does. Here’s how:

TZ=UTC ./SampleApp ../../Integration/AlexaClientSDKConfig.json $LOCAL_BUILD/models DEBUG9

Yes, at the end of the command to launch the sample app, just add “DEBUG9” to drop into verbose logging mode.

Once I did this, I found my issue. This message was being output by the sample app.

Missing decoder: MPEG-1 Layer 3 (MP3)

Somehow all that “compiled from source” software had failed to find the resources it needed when trying to build an mp3 decoding plugin for Gstreamer. Perhaps if I had used a Raspbian with a GUI, that may have had a pre-installed mp3 decoder but the Lite version definitely didn’t. I futzed about for a bit trying to entice the mp3 decoder plugin for Gstreamer to build, but in the end decided to simply install the pre-built binaries using apt:

sudo apt-get install gstreamer0.10-plugins-bad

Once I did this, bingo! Alexa spoke. Phew!

I hope this article helps you successfully build your own Alexa device. Let me know in the comments.

What do you plan to do with Alexa on your Pi?