To succeed as a disruptive digital business, you’re going to need to cultivate some team behaviours and personal qualities that might not have seemed so important in the past.
I believe these four Cs are the key attributes you need in your organisation if you want to be the disruptor and not the disrupted.
Curious people are not satisfied by the things they already know about and understand — they know there is so much they don’t know yet, and so much to learn.
Curious people help to disrupt the market by uncovering new knowledge and ideas, and changing everything in the process.
Curiosity is the spark that triggers innovation.
Creative people take the things they know and relate them to find patterns. They extrapolated new ideas, they try things, they make suggestions out of left field.
Creative people aren’t shackled to old ways of doing things. They are always looking to find better ways.
Creative people don’t say “no”, they say “give me time and I’ll find a way”. If you want to disrupt rather than be disrupted, you need creative people.
Collaboration fosters openness and trust, which underpins positive team culture.
Collaboration allows us to work more efficiently by breaking down silos and promoting a common vision and shared goals.
Collaboration allows you to leverage the different strengths of everyone in your team by allowing everyone’s ideas to be heard and by promoting discussion.
Culture drives performance. Poor culture kills curiosity, creativity and collaboration, leading to lower quality and staff engagement. Good culture promotes and maximises the other 3 Cs and is key to attracting and retaining talent.
Culture-focussed leaders know future success lies in creating an environment within which curious and creative people can collaborate and succeed.
In Conclusion
Digital businesses need openness and agility to achieve their goals.
Curiosity, creativity, collaboration and culture are essential to creating organisations that move fast, work efficiently and are not prone to getting stuck in the past.
In essence, it’s that simple. But how do we do that?
TL;DR: We do this by finding the best alignment between work and individual motivators, then getting out of the way.
The importance of empathy
Helping others to succeed requires empathy. Without empathy you will struggle to be an effective leader.
Empathy allows you to see the world from another person’s perspective. Empathy gives you insight into their thoughts and feelings. It is essential for leadership because it allows us to understand what motivates other people.
If you struggle with empathy, there are ways to improve. Try:
being present & focussed on others when they speak (eg instead of preoccupied by your phone)
asking questions of others – never assume you know what they think or why until they have actually told you; it’s lazy and disrespectful and you’re probably wrong
arguing for the side of a debate you personally disagree with (try debating with knives)
Let’s assume for now you have empathy on tap.
Detecting motivation
Do you understand why your people come to work every day?
When do you see them smiling? When do they speak to you excitedly, or with passion?
What have they told you they enjoy doing? (Have you asked them?) What tasks will you sometimes see them working on outside normal hours?
Did they experiment with some new technology on their weekend that they were keen to tell you about?
These are the clues, and your job as a leader is to see, hear and decipher them.
The importance of Intrinsic motivation
Carrot and stick approaches have been proven to be ineffective (and often counter-productive) for knowledge workers. Science tells us that we do good work not because we get paid to do it, but because we are internally (intrinsically) motivated to do so.
Intrinsic motivators are things like:
enjoying the process of a particular type of work
wanting to do things well
feeling accomplished
satisfying our curiosity
learning something new
getting better at something
being a part of something important or that we feel is worthwhile
feeling useful
expressing our creativity
enjoying being part of a community
Your goal as a leader is to create an environment for your people where they are being intrinsically motivated to do their best work. This involves mapping the work your business needs to do with the intrinsic motivators your people possess.
Think about what’s involved in the work you need doing and find ways for people to explore their passions through it.
Extrinsic motivators
It would be nice if all of our time could be filled with work that is intrinsically motivated, but there will be extrinsic (external) motivators that sometimes matter as well. Here are some examples:
deadlines
operational crises
negative feedback
having to pay the mortgage, eat etc
uninteresting work that needs to be done anyway
bureaucratic stuff like filling out timesheets
The optimum situation for most people will be to spend as little time as possible on tasks like these. The more the balance tips towards external motivators, the less productive people will be, the lower the quality of their work and the less satisfaction they will be getting from doing it.
So, the other part of your job is to minimise the impact of extrinsic motivators.
If your boss gives you nothing but extrinsic motivators, he’s probably a toxic leader. That’s a topic for another day.
So to summarise, as a leader your most important job is to exercise the skill of empathy so you can
know what your people are motivated to do and
match up the business needs to those intrinsic motivators to the greatest degree possible
At the same time, you should be ensuring that as little of their energy as possible is expended on extrinsic motivators. This might mean you need to argue with the business for a better timesheeting solution, or better productivity tools. Make sure your people are paid enough that they aren’t spending energy on being annoyed about being underpaid. Buffer external events by being the firewall between your team and crises or negative feedback.
Read more
Dan Pink has a book about motivation for 21st century work called Drive. Here is a video that summarises his ideas about Autonomy, Mastery and Purpose.
What do you think? Share your thoughts in the comments section below.
There are lots of web pages with advice on how to do this, but they all seemed annoyingly complicated, and sometimes the advice is outdated, so I figured out my own simpler solution. This advice is good as of December 2017, so it should last all through to the official release of Alexa in Australia when all this hoo-ha will be unnecessary.
The first advice you’ll usually get is to install the Alexa app from the US App Store by doing a complicated dance with Apple to create a second App Store account whilst pretending to be in the US. You don’t need the app! The Alexa web site does everything you’ll need.
To start, go to https://alexa.amazon.com/ and log in, then go to Settings, then “Set up a new device” – there are instructions for every type of device. Basically this takes you through the old school way to set up a device, putting the Alexa device into hotspot mode, connecting to its network then pulling up a config page where you can tell it how to get on your WiFi network.
Once you have the Alexa on your network, the next hassle is to configure the settings on your device so it knows you’re in Australia and gives you the right time and weather. I independently arrived at the same solution for this that these guys did, so rather than me redoing all their nice work, just go there and follow their instructions. It looks a bit scary but it’s not hard – if you’re a web dev like me and therefore used to fiddling with pages in Developer Tools in Chrome you will feel right at home.
If you have a lot of computers running at the same time and you don’t want to have to wrangle multiple keyboards and mice to control them all, you need Synergy.
Raspberry Pis are so small and cheap that, if you’re like me, you will probably end up with a few on your desk at the same time. Using Synergy (from Symless) you can enable your main keyboard and mouse to control all of them.
Synergy is easy to use – you simply mouse out of your main screen and over to the monitor of the other machine to control it. Whichever screen has the mouse focus also gets the keyboard input. It’s almost magical.
Define your screen arrangement using Synergy
With Synergy, you have one computer acting as the server; this is the machine that has the keyboard and mouse we will use to control the other computers. Other computers connect to the server as Synergy clients.
Both the client and the server must be running compatible versions of Synergy. Unfortunately, current Raspbian builds only contain older versions of Synergy and these won’t work if your Synergy server is running a later version. If your server computer is a Mac or Windows machine this will probably be the case. If you are in this situation, you will need to build a more recent version of Synergy on your Pis from source.
Note: I recommend you buy the Pro version of Synergy, not only because it adds SSL support but because the USD29 will support the ongoing development of the product.
While that’s happening, download the source of Synergy from https://symless.com/synergy/downloads as a tar.gz file and copy it to your Pi. Then
tar xzf synergy-v1.8.8-stable-25a8cb2-Source.tar.gz
cd synergy-v1.8.8-stable-c30301e-Source
Now you’re in the source directory you need to run the configure step
QT_SELECT=4 ./hm.sh conf -g1
Note: If you see an error “Error: Could not get revision, git error: 128” you can safely ignore it.
Then:
./hm.sh build
If you get an error “Error: make -w failed with error: 512″ you can ignore that too.
Now you can the build the GUI app.
cd src/gui
qmake
make
Go back to the source root and copy all the built binaries to /usr/local/bin
cd ../../
sudo cp bin/syn* /usr/local/bin
Then run the Synergy GUI,
/usr/local/bin/synergy &
In the GUI you can configure the server you will connect to, and enter your license key, if you have one.
Making sure Synergy is always running
You want Synergy to start on boot, so you never have to reconnect the keyboard or mouse. Follow these instructions to do that (adapted from this page):
sudo raspi-config
(Select "Boot Options", then "Desktop Autologin")
Create the Synergy client autostart file (must be as user pi, NOT root!)
Write a little bash script to start synergyc with the necessary options. This is based on one I found here – you should modify the command line to match your setup (eg remove the enable-crypto flag if you won’t use SSL).
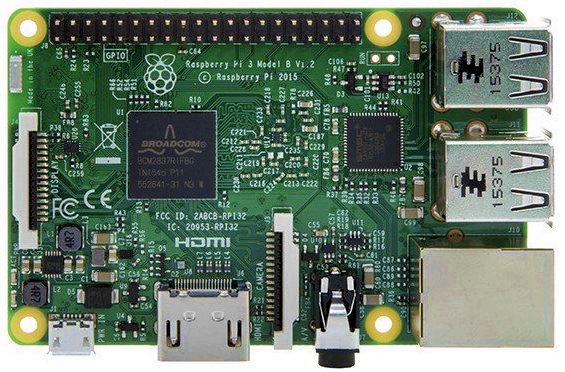
For those of you who don’t know what these things are, they’re credit card sized computers, complete with a CPU, GPU, RAM, Ethernet port, USB ports, WiFi, and Bluetooth. They have onboard sound and video support via HDMI.
Sounds expensive, right? Nope. Less than sixty Australian dollars will buy you one.
Raspberry Pi approximately actual size
Anyway, the other thing that I’m very interested in right now is how voice-based AI systems (eg Siri, Cortana) are being used to build the human-computer interfaces of the future. So, I was excited to see Amazon Web Services release their new Alexa Voice Service SDK to developers, and doubly so to see them provide support for running it on the Pi.
The AVS SDK is designed to allow device manufacturers to build their own Alexa device, but Raspberry Pi owners (or anyone with a computer running Linux or MacOS) can also get in on the act. For free. All it’ll cost you is the time setting it up, and in the case of a Raspberry Pi, the $55 for the Pi 3 plus another $30 or so for a few other bits and pieces.
That’s so cheap, you can start thinking about what it might be like to give a spoken-word interface to all the things you interact with.
Sounds great, right? And it is, but technology is complicated and like someone once said “there ain’t no such thing as a free lunch”. Kudos to AWS for making such complete-looking documentation to get AVS on a Pi, but even though I followed it closely, there were still some places I stumbled.
I’m going to describe those here now so maybe you won’t have the same frustrations I did.
Prepare your device
First of all, make sure you have your sound hardware sorted out before you begin. The Pi 3 has no audio inputs on board, so you have to buy a USB audio “card” (actually a USB dongle) to create an input for your microphone. There are units that are known to be compatible with the Pi – I suggest you buy one of those. I used a different type, but it worked, so I guess I just got lucky.
Once you have your audio card set up, check that you can record and listen back to audio. You can use arecord and aplay to do that:
If you hear what you’ve recorded, you’re on your way to success. If you don’t, or you hear static, you may need to follow this guide to set up your Pi to use your hardware.
Another tip before you begin – the guide suggests you might like to build your Alexa on the Lite version of Raspbian, which has no GUI, ie it does not include a point and click “windowed” desktop environment. If you choose to do this (it does make sense if this will be a dedicated Alexa device) you will need to be aware that various instructions in the guide are written as if you can open a web browser on the device, which you won’t be able to do. Instead, you will need to do the steps that involve a web browser from another machine on your network, ie treating the Pi like a web server. To do this you will probably need to set up an SSH tunnel that port forwards between the machines. For reference, the command to do that (from the machine with the web browser) is:
ssh -L 3000:192.168.0.81:3000 -p 22 -l pi -N 192.168.0.81
Where 192.168.0.81 is the IP of your Pi, and “pi” is the username you log on with.
Rubber, meet road
Ok, if you’ve gotten to this point, you’re ready to start going through the quick-start guide and installing the AVS SDK and sample app software on your Pi.
Go ahead, I’ll wait.
This bit is going to take an hour or so, because the instructions do a lot of building of binaries from source instead of relying on the in-built package manager in Raspbian (apt). As it turned out, I ended up with reason to question the wisdom or necessity of at least some of that, but more on that later.
Once all the software has been compiled you’re at the exciting part where you fire up the AuthServer to get a token to bring Alexa to life. If you followed the guide like I did, though, you will be seeing errors about Flask about now.
The problem is that they missed a step in the Raspberry Pi guide – you need to install the Python package manager (pip), and use it to install Flask because the AuthServer uses it. They did list these instructions in the generic Linux guide, so you can follow the steps there, or tl;dr:
Ok, so now you can run the authorise process and you have your token. If you’re like me, you’ll be very keen to run the sample app and ask Alexa some probing questions.
If you’re like me though, you will also get to the end of the guide, run the app and find Alexa remains stubbornly silent.
Hmm.
Finding the debug switch
In my case, everything *looked* like it was working fine – the app woke up when I said “Alexa”, said it was listening, then thinking…but there was no audio response. Of course, after all that time sitting watching the compiler this is the last thing you want to see.
So, what was going wrong? I needed to run the app in debug mode so I could see what errors were being thrown. The Pi guide doesn’t mention how to do this, but the Linux guide does. Here’s how:
Yes, at the end of the command to launch the sample app, just add “DEBUG9” to drop into verbose logging mode.
Once I did this, I found my issue. This message was being output by the sample app.
Missing decoder: MPEG-1Layer3(MP3)
Somehow all that “compiled from source” software had failed to find the resources it needed when trying to build an mp3 decoding plugin for Gstreamer. Perhaps if I had used a Raspbian with a GUI, that may have had a pre-installed mp3 decoder but the Lite version definitely didn’t. I futzed about for a bit trying to entice the mp3 decoder plugin for Gstreamer to build, but in the end decided to simply install the pre-built binaries using apt:
sudo apt-get install gstreamer0.10-plugins-bad
Once I did this, bingo! Alexa spoke. Phew!
I hope this article helps you successfully build your own Alexa device. Let me know in the comments.
A few weeks ago I started a project to set up a new home for my various web projects in the AWS cloud. All these sites use WordPress, and I wanted to make sure I built them on a robust and scalable architecture.
The tricky thing with WordPress is that it was designed around a traditional web server model, where one physical (or virtual) machine serves one instance of the code. When you update themes or plugins, or upload content, you change the data on that instances’s locally attached storage. I wanted to be able to horizontally scale, and WordPress’s design makes that difficult.
Horizontal scaling is achieved by adding additional server instances to spread the load, whereas vertical scaling relies on beefing up the one machine with more CPU or memory. Horizontal scaling is generally preferable, because it not only provides more flexible scaling, eg you can scale up during periods of peak demand, and scale back down later, but because it gives you the added benefit of redundancy – if I have three machines serving my web sites, I can have two die and still be online, albeit perhaps in a degraded state.
To achieve this horizontal scaling in AWS, we need a way to have many machines share the same set of code. Amazon’s Elastic File System allows us to do that by providing an NFSv4 compatible file system that can be mounted simultaneously to many EC2 instances. All the instances can read and write the same filesystem – problem solved.
So, I built a machine image for my WordPress solution that, on boot, would update itself and mount the EFS volume, ready to serve the shared code within. I set up an autoscaling group and an Application Load balancer to distribute traffic to them. I moved my domains to Route53 bound them via aliases to the LB’s AWS resource name. I used Amazon Certificate Manager to create (free!) SSL certificates that are automatically bound to the LBs. I backed this WordPress Taj Mahal with an Aurora RDS instance and enabled Cloudfront as a CDN.
It was all too easy, and the result was exactly what I wanted. I sat back feeling smug.
Of course, that didn’t last long. A few days ago I got a Pingdom alert saying a site was down. Then another, and another…what was going on?
I went online to check…”Bad Gateway 504″. Oh crap. Hm.
So what was failing? EC2 instances? Load balancer? Some weird WordPress problem? I checked them all and was none the wiser. Unfortunately for me, this happened at 8am on a workday, so I had to leave everything in a broken state and come back to it later.
When I logged in later, I noticed that requests to read the content on the EFS volume mounted on the EC2 instances took a long time to respond – several seconds in some cases. Hm, dodgy EFS? Nope, all the data seemed fine and there was nothing in the EFS console that looked like an alarm.
So, I tried that classic IT trick of turning it on and off again. I rebooted EC2 instances, I unmounted and remounted the volumes…nothing helped.
Having exhausted all the other possibilities, I concluded that the EFS performance issue had to be the cause of all my problems, so I posted an issue with AWS support. The next morning, I had my answer.
“You’ve run out of EFS Burst Credits.”
Huh?
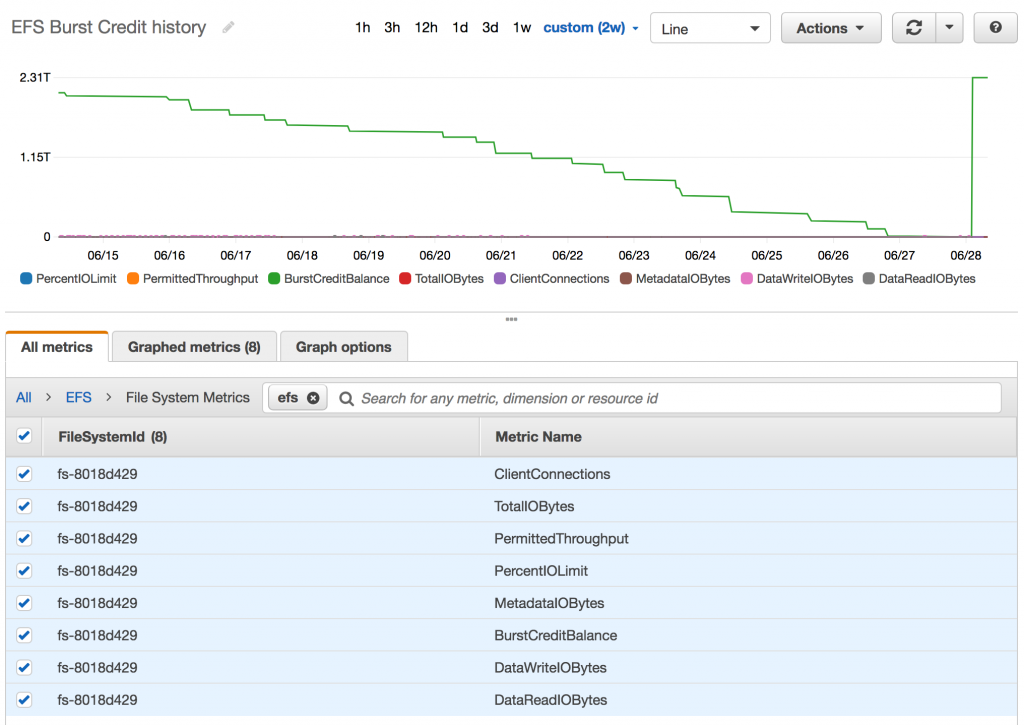
So, I guess I hadn’t been paying as much attention as I should and this detail had passed me by…EFS volumes have “Burst Credits” that are calculated based on the size of the data stored on them. And it seems when you run out of burst credits, you can expect your EFS volume’s performance to suck badly enough that your whole system can fail.
Here’s how my EFS burst credit level dropped over the preceding two weeks:
As my EFS volume is under a GB in size, it generates very little in the way of burst credits. You can check out the details here.
You can also see here that it’s the ONLY metric that mattered. And boy, did it cause me some grief.
So, my new plan is to keep using EFS, but to use rsync, on boot, to clone the data from the EFS mount to the locally attached EBS volume and use that as the web server’s document root. I’ll leave rsync running to watch both the local and the EFS filesystems for changes and to keep them in sync.
Note to the folks at AWS – put the burst credit metric on the EFS console! Don’t make schmucks like me find out the hard way!
It’s a common problem in technology companies – people have opinions that they hold strongly because they are passionate about the technology they like, know, or believe is the best. The passion is good, because it drives enthusiasm and engagement, but how do we resolve differences of opinion, when those differences threaten to derail desired business outcomes?
The first step to achieving agreement is to ensure everyone is sharing the same understanding about what the business is trying to do. Without this crucial alignment, there can’t be agreement because people will be pulling in different directions. In organisations where the vision has not been clearly communicated this can be a challenge, but it’s a first principle on which everything else is founded: agree the vision.
So, let’s assume we’ve got the vision, and everyone understands it. Has everyone committed to it? If not, there’s our next problem. If people aren’t committed to the vision, and aren’t acting in accordance with it, then our team is broken. We need to find out why people aren’t committing to the vision and fix it.
Assuming we have the vision and everyone is committed to it, things should get easier from here on. We can now make our decisions based on how well they help us achieve the vision. How do we do that?
Most of us are making decisions daily, based solely on our prior knowledge and our intuition. This is known as the Recognition-Primed Decision making process (RPD). If we understand and are committed to the vision, there is nothing wrong with this – it’s fast and will give us a right-enough answer most of the time. The only caveat is that it does rely on our ability (and willingness) to accurately compile knowledge. Given that we all suffer from “myside” bias, to some degree, the quality of decisions made this way will thus vary proportionally to the degree to which we accurately catalogue and draw upon our experiences.
RPD works well when we have the needed expertise and the decision scope is limited to things we are solely responsible for. Even when responsibility spans multiple people or groups, we may still be able to work this way, so long as there is general agreement to start with (everyone is committed to the same vision), and we are collaborative in how we work. The key here is to make sure that everyone who could be affected by our decisions is kept informed and given the opportunity to speak up with any concerns about the choices we are making. Feedback needs to be sought and considered.
If we are working instead in an environment where communication is not optimal, we may need to engage in a more structured process for making decisions.
One way to do this is to use a decision matrix. A popular version of this is the Kepner-Tregoe decision analysis (KTDA) process, which aims to guide us through steps that are designed to lead us to a rational decision.
The first step in the KTDA is to write a concise “decision statement” about what it is we want to decide. An example is “What sort of pet should I get?”
Next, we will specify the objectives of the decision – what does this decision need to provide in terms of results. Each objective needs to be classified as either a “must” (the decision must deliver this objective) or a “want”. Objectives are then weighted to indicate their importance, eg, if it is very important that my pet have soft fur, I will weight that objective as a 10.
It’s important, when weighting objectives to be as honest as possible about the true importance of that objective, as this is where we will often attempt to “stack the deck” in favour of our preferred option. Get a multi-person consensus on the weightings before you move to the next stage.
Once we have our decision statement and our weighted objectives agreed we can begin evaluating each alternative (eg, cat, dog, turtle). To do this, each alternative is scored, from 0-10, on how well it delivers each objective. Again, this is a moment where our preferences can bias our answers, so it’s important to gain consensus on the scores.
Once you have all your scores in place, the final score for each alternative is calculated by multiplying the score with the weighting for each objective. Alternatives that fail to deliver a “must” objective are excluded. The alternative with the highest score is the one that, rationally, best delivers the objectives and is the one that should be chosen.
Here’s a worked example:
In this example, even though the dog rates very highly on home security and companionship, because I didn’t weight home security as highly as I did soft fur the cat ended up with the highest score. Because I considered soft fur a must, the turtle had to be excluded.
Here, kitty kitty.
Crucial to any decision-making process is its ability to minimise the influence of unfounded beliefs and prejudices. It should also aim to remove emotional heat from the process by allowing everyone to see that their preference has been evaluated fairly and objectively.
Of course, humans aren’t always rational and objectivity is hard, so even with the best of intentions any rational process can be subverted. By following the processes here we can at least provide a paper trail as to how decisions were made. Later, if we find we made the wrong call we can always go back and see how we arrived at the wrong conclusion and learn from it.
Node-RED is a truly awesome tool that allows you to very quickly build an app that can talk to IoT hardware (eg devices like a Raspberry Pi), your local machine and online services. In the matter of a few minutes you can hook all these things together and getting them doing something useful.
At my place we have two Internet connections. One of them is hooked up via a router that is the best part of a decade old. It works pretty reliably, when it works, but every 36-48 hours it locks up and stops working and has to be rebooted.
I’ve put up with the inconvenience of this for years, but tonight I decided I’d finally had enough and it was time to solve the problem.
If you want to give this a try at home, the first step is to install Node.js. You can do that from here. Then, install Node-RED and some other npm modules we’ll want (these instructions work for MacOSX, you may need to vary them for your system):
Then, once everything is installed, run node-red using pm2:
pm2 start /usr/local/bin/node-red -- -v
If all has gone well, you should now be able to open a web browser, point it to localhost on your machine on port 1880 and see this:
If that’s what you see, you’re ready to build!
Building an app in Node-RED involves creating a “flow”. A flow is simply a set of nodes (those things in the list on the left), “wired” together and configured to do what you need.
A node can be an input node, and output node, or a function node through which messages can flow both in and out. Messages originate at input nodes, travel through from none to many function nodes and are emitted at an output node. Each node has the opportunity to modify the message payload before it is passed to the next node. Function nodes can have more than one output, which allows you to create branching logic.
Nodes are configured by double-clicking them, which opens a panel that allows you to set parameters for that node. “Wires” connect the output from one node to the input of the next. This is all done by pointing and clicking and dragging. Couldn’t get much simpler!
So, what I need is a flow that will attempt to access the Internet via the flaky router. If it succeeds, all is well and I don’t need to do anything more. If it fails, I want to call the web UI on the router and tell it to reset the router. Then I want an SMS notification to be sent to my phone, letting me know of the outage and router reset.
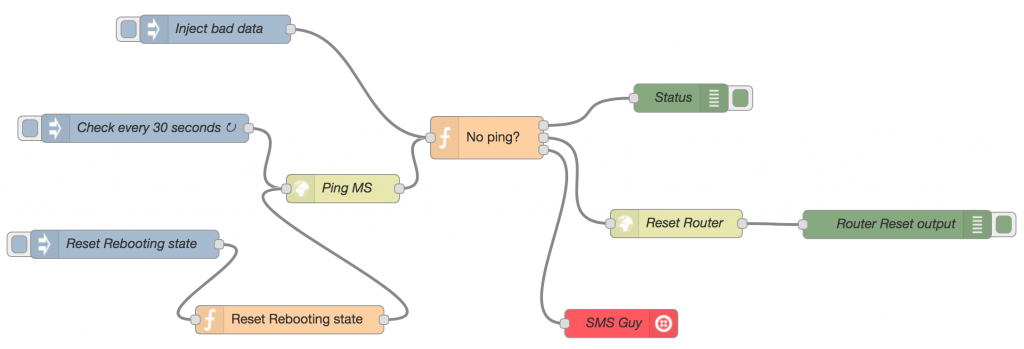
Here’s how to do this with Node-RED:
You can see I have three input nodes – two are used to trigger test scenarios, so I won’t describe them here. The one that matters is the “Check every 30 seconds” input node that I have configured to inject a message into my flow every 30 seconds. This message flows to the http request node which is configured (when triggered by a message arriving) to do a GET call on www.microsoft.com (initially I used Google, but they don’t like being used this way). The data returned from that request gets loaded into the message object’s payload slot and passed to the next node.
The “No ping?” node is a Javascript function that looks at the message payload data from the http request and checks to see if it looks like it comes from the pinged site.
If the data doesn’t contain the string “Microsoft”, and the device isn’t currently being rebooted, the function emits a message out of its second output that flows into and triggers the “Reset Modem” HTTP request node.
The HTTP request simply emulates the web call that my router’s web UI makes when I click the “Reset” button on it.
var rebooting = flow.get('rebooting') || false;
// if null, no message will be passed to the output
var msg2 = null;
var msg3 = null;

if (msg.payload.match(/Microsoft/)) {
    if (!rebooting) {
        msg.payload = 'OK';
    }
    else {
        node.warn("Reboot complete");
        var currentTime = new Date().toLocaleTimeString();
        msg.payload = 'Reboot complete at ' + currentTime;
        flow.set('rebooting', false);
        var smsMessage = 'Router down from ';
        smsMessage += flow.get('rebootStart');
        smsMessage += ' to ' + currentTime;
        msg3 = { payload: smsMessage };
    }
}
else {
    if (rebooting === false) {
        node.warn("Rebooting");
        var currentTime = new Date().toLocaleTimeString();
        msg2 = { payload: 'factory=E0' };
        flow.set('rebooting', true);
        flow.set('rebootStart', currentTime);
        msg.payload = 'Requesting Reboot at ' + currentTime;
    }
    else {
        msg.payload = 'Reboot in progress';
    }
}

return [msg, msg2, msg3];
If the data does contain the expected string, either the router is still working fine, in which case it emits a message out to the console to say “OK”, or it indicates that the router is working again after a reboot.
I’m storing state in the flow context so that I don’t trigger additional reboots when a reboot is already in progress. I also use the stored state to determine when a reboot is complete, and when it is I use a third output to send an SMS telling me the start and end time of the outage.
Now, whenever my router goes down, it’ll automatically get reset, and once it’s back up I’ll get an SMS to let me know what happened, and how long the outage lasted.
Much better!
Have a play with Node-RED and let me know what you think in the comments.
PS: Node-RED has other nodes for getting data and working with it in a myriad of ways, including support for different kinds of protocols, storage engines, cloud services, and home automation gear. All of it is Open Source and free to use. Check it out.
UPDATE: Android surpasses Windows as the world’s most popular operating system for the first time. Windows’ decline continues.
Original article follows…
An update for you with some interesting stats for Internet-using computers of all shapes and sizes. You will see they are continuing to follow a long term trend. (TL;DR people are continuing to move from desktop PCs to devices, and Windows market share is dropping as a result.)
Firstly, it looks like Android may surpass Windows as the most popular OS for Internet users (globally) sometime in the next few months.
Of course, these figures are somewhat skewed by the bazillions of users in Asia, but the trend is also visible in other markets as people turn away from desktops and towards devices.
Europe remains strongest for Windows, overall, though its decline there is still pretty consistent.
North America reveals a, perhaps predictably, higher share of Apple devotees than other regions. iOS is the second-most popular OS.
Think about that for a moment.
In the US, 38% of users are now using an Apple-branded computer or device to access the Internet. 60% are now using an OS other than Windows.
A mere 5 years ago Windows had 75% of the market and such a decline would have seemed unthinkable. If the long-term trend continues, in 6 months it will be half that.
If you’re a desktop app developer, you might want to consider what is compelling about the desktop environment and make sure you play to its strengths. You might also consider getting some experience in developing for mobile.
Turning to the Web Browser market, we see the market share of IE is now below 5% globally. Millions of web developers cry “hurrah!”.
Perhaps surprisingly, globally, Edge does not even rate a mention yet, and is lagging behind even the perpetual bridesmaid Opera in popularity. Chrome continues to grow in popularity and market share.
Even in the US, traditionally a market that has strong IE support, IE is continuing the steady downward trend and now sit at 8.1%. Edge is growing but almost imperceptibly – certainly not as fast as IE is shedding market share – and now sits at 3.4%. By contrast, check out those Safari numbers!
In Europe, IE and Edge combined are at about 8% of the market, with Edge again barely growing share as IE continues to drop year on year.
What does it all mean?
Well, if you’re a web developer it’s all pretty good news, showing that the worst browsers ever invented™ continue their slide into obscurity. It also tells us that if we plan to target China and India, we probably need to start testing web apps in the UC browser on Android devices.
If you’re a desktop app developer, you might want to consider what is compelling about the desktop environment and make sure you play to its strengths. You might also consider getting some experience in developing for mobile.
A counter-balance to this info is that while we continue to service customers with corporate networks that are slow to embrace change we might take some comfort from that acting as a brake on those customers asking for something different.
Unfortunately, it also means we’ll keep getting the question “yes, but does it work in IE?”.
When I was at high school in the 80s, computers were about the most boring things I could imagine. They couldn’t do anything cool, unless your idea of cool was maths, and to program them was like talking very slowly to a barely literate person with an IQ of 50.
In the 90s, things changed.
By the 90s, computers had become capable of doing things for you that you couldn’t do better by hand. In the 90s, they started connecting to one another and becoming part of the Internet we all take for granted today. In the 90s, computers started waiting for us, instead of the other way around.
Let’s do stuff!
I got my first computer in the 90s, and immediately started a business doing digital imaging using Photoshop. Kodak at this point was still sleeping peacefully, figuring all this digital stuff was a fad that would be over soon.
The world wide web was hitting the news in the 90s. It took a while for people to figure out what it was, but when they did, the web took off exponentially. Even the dot.com meltdown in 2001 couldn’t really slow it down.
I started building for the web in the mid 90s and have been doing it ever since. In that time I have seen many incredible advances, and some monumental follies*, from vector-animation to 3D, streaming audio and video, WebSockets and WebGL through to initiatives like WebAssembly. The web just keeps getting stronger and more capable. Importantly, it has also stayed open, despite the best attempts by some companies to subvert it.
But even 10 years ago, few would have foreseen how different computing was going to be today.
Clouds appear
In the last 10 years, computing has gone from something we do at a desk or in server rooms to something we do everywhere, all the time. We are all carrying around computers in our pockets. We are seeing tiny cheap computers being built into every corner of our environments – from the smart TV to the wearable activity tracker and the smart watch, to the lightbulbs in your house and the locks on your doors. And it’s all connected via the web.
This is why, for me, the two most exciting technology trends today are Cloud computing and the Internet of Things.
Cloud computing got a lot of hype in the early years and some of it was just silly. The cloud’s infrastructure isn’t that different to what preceded it – it’s still run on servers in data centres, just like we did things in the past. What is different is how commoditised computing resources are changing the nature of computing itself. Servers are no longer purpose-built boxes in a DC that are configured to do one thing. Now they are simply a source of computing resources that can be abstracted away by higher level services. This means they can deliver the outcome we want without all the configuration and systems admin we used to have to do to get that outcome.
So while virtual machines that scale are nice, they are far from the most important thing that cloud computing has unlocked. By removing the need for me to manage my own servers, cloud computing has freed me to focus on the value I want my application to provide. Almost inevitably, this has lead to the concept of serverless architectures, where my application is only the code I need and nothing more. The cloud replaces the server stack I would otherwise spend my time maintaining.
New ways to think of software
This kind of thinking is opening up new ways to build applications. An example of this is AWS Step Functions, where an entire application can be pulled together via a visual workflow. Likewise, tools like AWS Simple Workflow Service offer ways to orchestrate your code in a serverless environment, and then to build out and connect it to systems hosted elsewhere and even to processes that existing in the non-virtual world. Tools like these are facilitating an increased connectedness, which in turn opens up new ideas as to what a software application is, and what it could be.
And then, humming at the edges of all that new cloud-enabled capability are the huge numbers of IoT devices that are popping up daily in our lives.
Devices everywhere
Before we had smartphones, who would have thought everyone carrying around a GPS receiver would be useful? Now we can’t live without them. This is just one familiar example of the IoT world that is heading our way, as we measure, monitor and report on more and more metrics we encounter in our everyday lives. Heart rate, steps taken, how much electricity we’re consuming, room temperature, environmental noise, pollution levels, security camera footage…it’s all being picked up and turned into knowledge we can use to improve our lives.
In industry, condition monitoring is a huge growth area, again driven in large part by low cost computer hardware. You can now put a $100 vibration monitor on a truck and collect that data. The data can allow you to predict when it will need servicing, which can save your company the cost of unscheduled downtime. The economics of this are becoming a no-brainer as computing hardware gets cheaper and smaller and wireless networking becomes increasingly ubiquitous.
One interesting result of the rise of IoT is how the cutting edge of computing has come full circle. In a world where servers are now being commoditised and abstracted away, there is renewed interest in physical computing. People are building their own devices, and plugging them into the cloud. They are getting reacquainted with low-level knowledge, like how serial communications work. They are learning how to gather data from sensors over GPIO pins on a circuit board. It’s an interesting development and one that bodes well for humanity, I think. It gets us back in touch with the magic of what, as a species, we’ve achieved over the last century.